23 Enchanting Christmas Village Decorations to Transform Your Holiday Decor
Christmas village decorations have a special way of making the holiday season feel magical, nostalgic, and full of wonder. From charming miniature houses glowing with warm lights to snowy streets lined with tiny Christmas trees, these beautiful displays bring the magic of a winter wonderland right into your home. Whether you love traditional Christmas decorating, cozy farmhouse interiors, vintage holiday pieces, or elegant winter-inspired displays, there are countless ways to create a village that feels uniquely yours.
The best part is that you don’t need an entire room or an elaborate collection to create something beautiful. A small tabletop, fireplace mantel, bookshelf, or unused corner can become a delightful Christmas village with the right combination of miniature buildings, greenery, snow, and festive details. You can keep things simple and understated or create a detailed holiday scene that becomes the centerpiece of your seasonal decorating.
If you’re looking for inspiration, these Christmas village decorations will help you create a charming display filled with warmth, personality, and timeless Christmas magic.
Classic Snowy Christmas Village Display
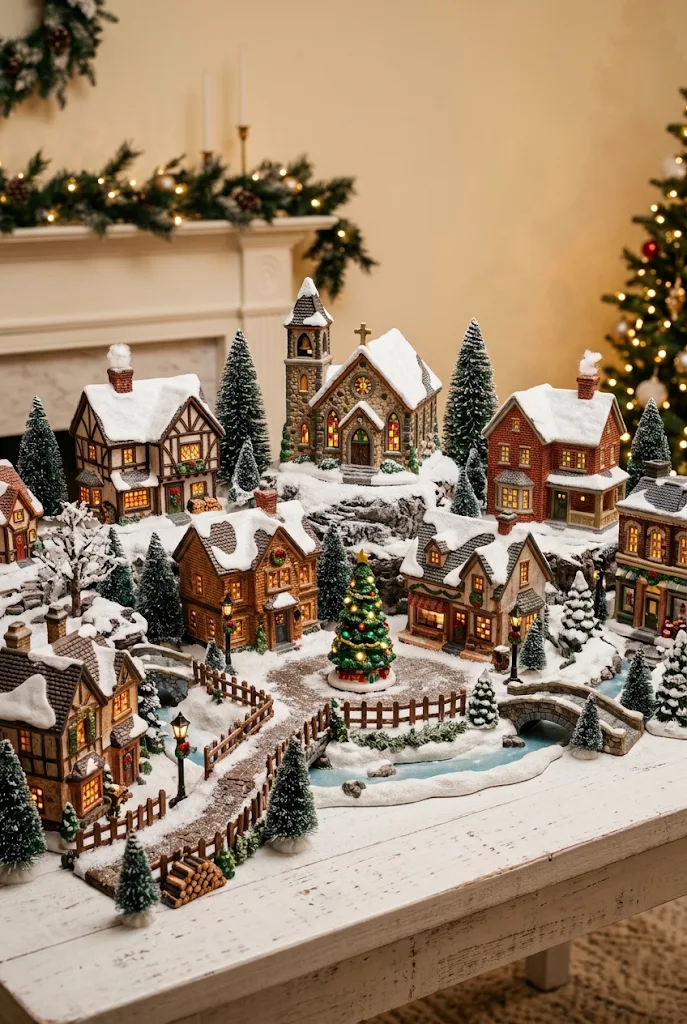
A classic snowy Christmas village is one of the most timeless ways to decorate your home for the holidays. Imagine a collection of beautiful miniature cottages, little churches, and traditional shops surrounded by soft white snow. Warm lights glowing through tiny windows create an inviting atmosphere that instantly makes the display feel alive.
Start with several ceramic or wooden village buildings in different sizes. Arrange the tallest pieces toward the back and smaller cottages toward the front to create depth. Add artificial snow across the entire surface, allowing a little extra to gather around the building foundations.
For a more realistic winter scene, include:
- Miniature bottle-brush Christmas trees in different heights.
- Tiny snow-covered fences and lamp posts.
- Warm-white LED lights inside illuminated houses.
- Small figurines walking along snowy pathways.
A white wooden tray or tabletop makes an excellent foundation. You can also place the display on a console table where its warm glow can be enjoyed throughout the evening.
Tip: Choose warm-white lighting instead of bright blue LEDs to give your village a softer, more traditional Christmas appearance.
Christmas Village on a Farmhouse Wooden Tray
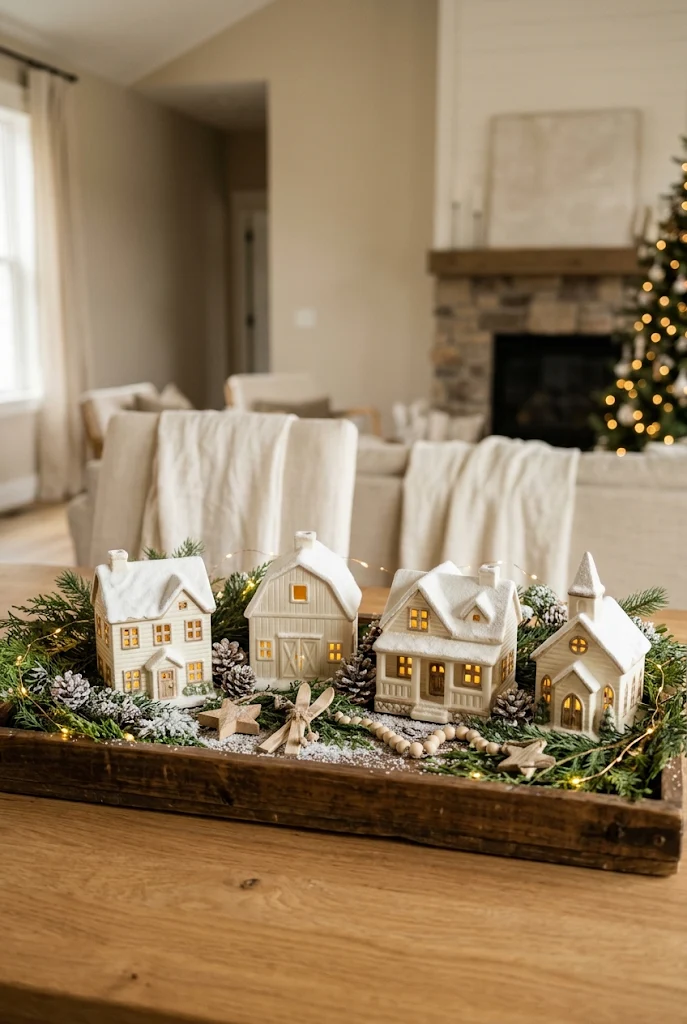
If you love warm farmhouse decorating, a Christmas village arranged on a rustic wooden tray is a lovely way to bring seasonal charm into your home. The combination of natural wood, miniature white houses, evergreen branches, and snowy accents creates a display that feels relaxed and beautifully coordinated.
Choose a rectangular wooden tray with a slightly distressed finish. Arrange three or four miniature houses inside, leaving enough space for greenery and decorative details. A combination of white, cream, and soft gray buildings works especially well against the warm wood.
You can enhance the arrangement with:
- Fresh or faux cedar and pine branches.
- Small pinecones and miniature ornaments.
- White decorative snow or cotton batting.
- Tiny wooden stars and rustic figurines.
This style looks particularly beautiful on a coffee table, kitchen island, or dining room sideboard. It also makes a wonderful centerpiece because the tray keeps all the decorative elements organized.
Try adding a small strand of battery-operated fairy lights between the houses. The gentle glow will highlight the natural textures and make the display feel extra cozy after sunset.
Elegant White and Gold Christmas Village
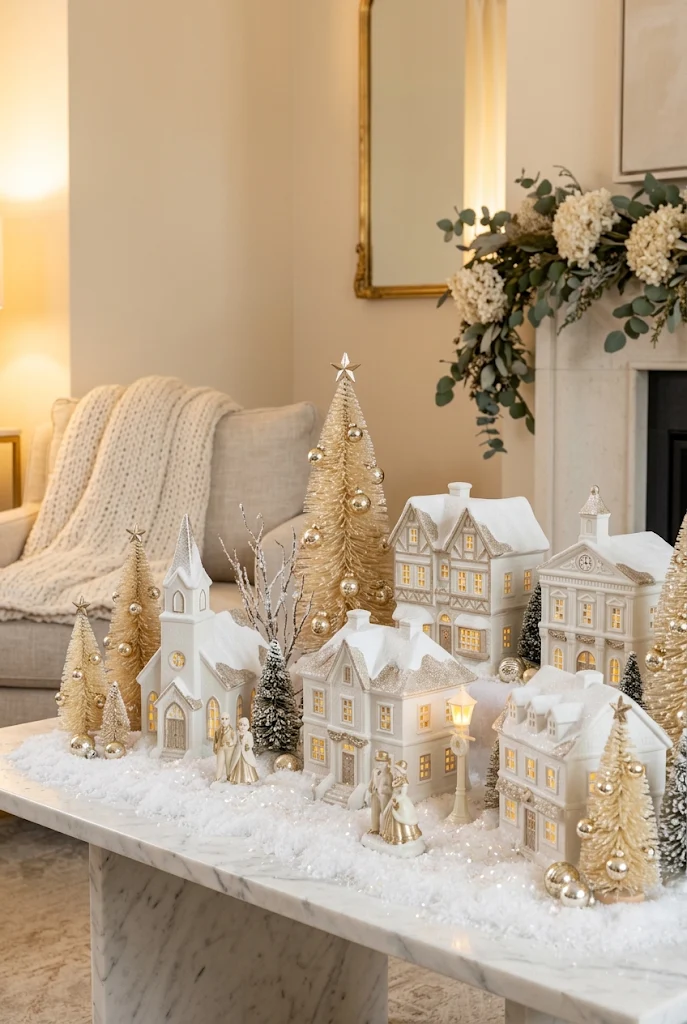
For a more sophisticated holiday look, consider creating a Christmas village with a beautiful white and gold color palette. Instead of traditional colorful decorations, this design focuses on soft ivory, champagne gold, warm metallic accents, and delicate lighting.
Begin with white ceramic village houses featuring simple architectural details. Look for pieces with snowy rooftops, tiny windows, and elegant finishes. Position them on a white decorative platform or a light marble-effect surface.
The gold accents should be subtle rather than overwhelming. A few carefully selected details can make the entire arrangement look luxurious.
Consider adding:
- Champagne-gold miniature trees.
- Small gold stars and decorative bells.
- Ivory bottle-brush trees.
- Warm-white LED lighting.
- Delicate gold-edged ornaments.
This arrangement looks especially beautiful in living rooms with neutral furniture, cream curtains, and warm metallic accessories.
Styling idea: Place a few gold trees behind the houses and smaller white trees in front to create visual depth without making the display feel crowded.
Christmas Village Under a Glass Cloche
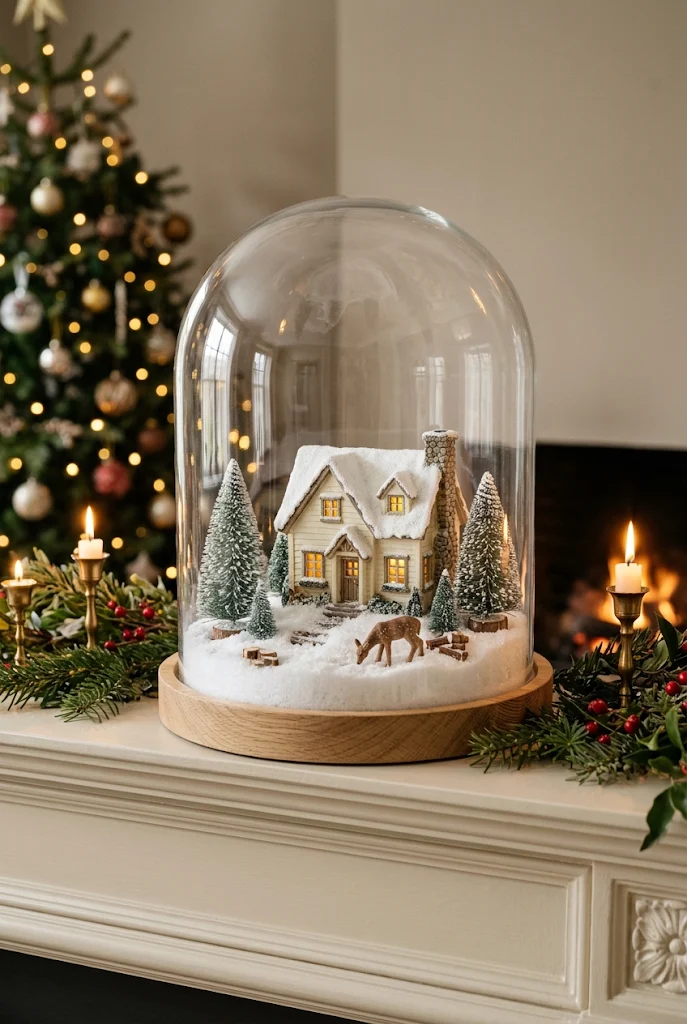
A glass cloche can turn even the simplest miniature Christmas scene into something that feels like a treasured holiday collectible. Its transparent dome creates a beautiful little world, making the tiny houses, trees, and snow look almost like a real winter landscape preserved under glass.
Choose a cloche with a wooden, brass, or neutral-colored base. Place one miniature house in the center and surround it with small snowy trees. You can add a tiny deer figurine or a miniature street lamp to give the scene more personality.
For the best results, keep the arrangement relatively simple. Too many objects can make the dome look crowded and hide the details.
Beautiful additions include:
- A small ceramic cottage.
- Miniature snow-covered evergreen trees.
- Fine artificial snow.
- Tiny woodland animals.
- A small battery-powered LED light.
A glass cloche village looks wonderful on a fireplace mantel, bedside table, or entryway console.
Try this: Use two cloches of different sizes together to create a coordinated Christmas vignette.
Vintage-Inspired Christmas Village
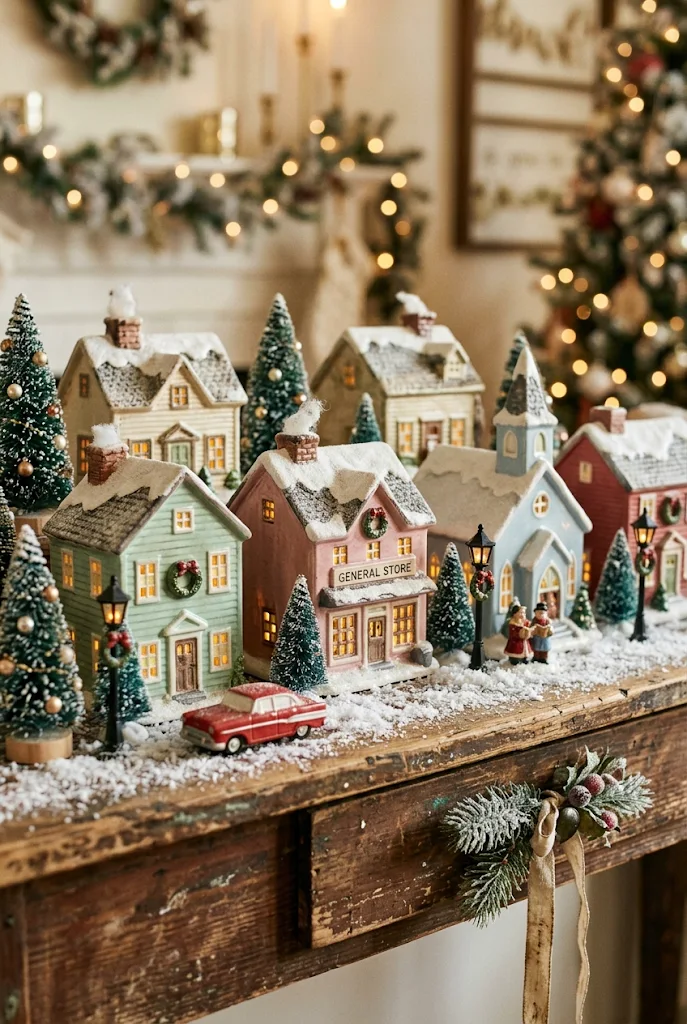
Vintage Christmas village decorations bring a wonderful sense of nostalgia to holiday decorating. Inspired by traditional Christmas collectibles, this style features charming little buildings, muted colors, delicate details, and decorations that feel as though they have been collected over several generations.
Look for miniature houses in faded red, soft mint green, pale blue, cream, and dusty pink. Vintage-inspired pieces often feature decorative rooftops, tiny shop signs, and old-fashioned architectural details.
Rather than arranging everything in a perfectly symmetrical line, create a slightly whimsical village with buildings positioned at different angles.
Include:
- Muted pastel ceramic houses.
- Retro bottle-brush trees.
- Miniature vintage cars.
- Small antique-style street lamps.
- Traditional red and silver ornaments.
A distressed wooden shelf or an antique-looking tabletop makes an excellent foundation.
The charm of this style comes from its collected appearance, so don’t worry about every piece matching perfectly. A mixture of shapes, colors, and textures makes the display feel more authentic.
Tip: Add one or two vintage-style Christmas postcards nearby for an extra nostalgic touch without overcrowding the village.
Christmas Village Fireplace Mantel Display
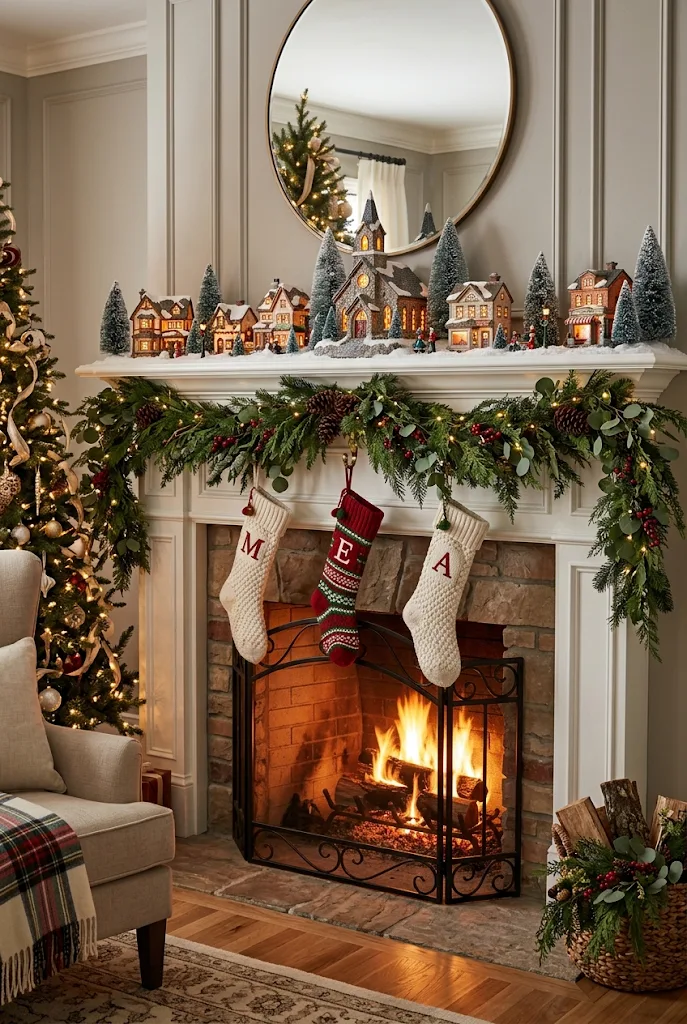
Your fireplace mantel is one of the best places to create a Christmas village because it naturally provides a long, elevated surface. A collection of miniature buildings arranged across the mantel can become a beautiful focal point in your living room.
Start by laying a soft layer of artificial snow or white fabric across the mantel. Position your tallest buildings toward the center or at either end, then fill the spaces with smaller cottages and decorative trees.
A lush evergreen garland underneath the display helps connect all the individual pieces. Add warm fairy lights through the greenery so the entire mantel glows beautifully at night.
For a balanced look, consider:
- Three to five miniature village buildings.
- Different sizes of snowy bottle-brush trees.
- Natural pine garland.
- Warm-white string lights.
- A few simple Christmas stockings below.
If your mantel is narrow, use smaller buildings and avoid placing too many decorations along the front edge.
Styling tip: Keep the color palette consistent with the rest of your living room so the village feels like part of the overall holiday design.
Miniature Christmas Village on a Tiered Tray
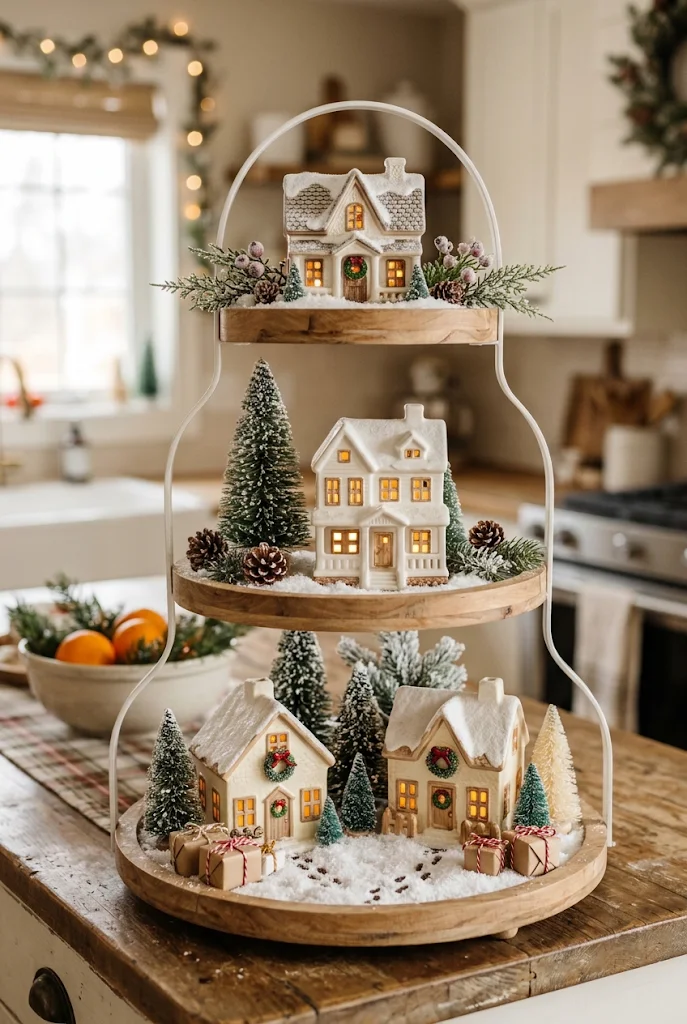
A tiered tray is a clever way to create a Christmas village when you don’t have much decorating space. Instead of spreading the miniature buildings across a large table, you can arrange them vertically and create a charming layered display.
Choose a wooden or white metal tiered tray with enough room for miniature houses. Start with the largest pieces on the bottom tier and use smaller cottages and decorative trees toward the top.
Each level can have its own little winter scene. For example, the bottom tier might feature a miniature shop and snowy trees, while the middle tier holds two cottages and the top tier displays a single decorative house.
Add small details such as:
- Miniature wooden snowflakes.
- Tiny pinecones.
- White faux snow.
- Small evergreen sprigs.
- Miniature gift boxes.
A tiered village looks lovely on a kitchen island, coffee station, or dining room counter.
Try this: Use matching miniature houses across the tiers to create a coordinated display that feels intentional rather than crowded.
Rustic Woodland Christmas Village
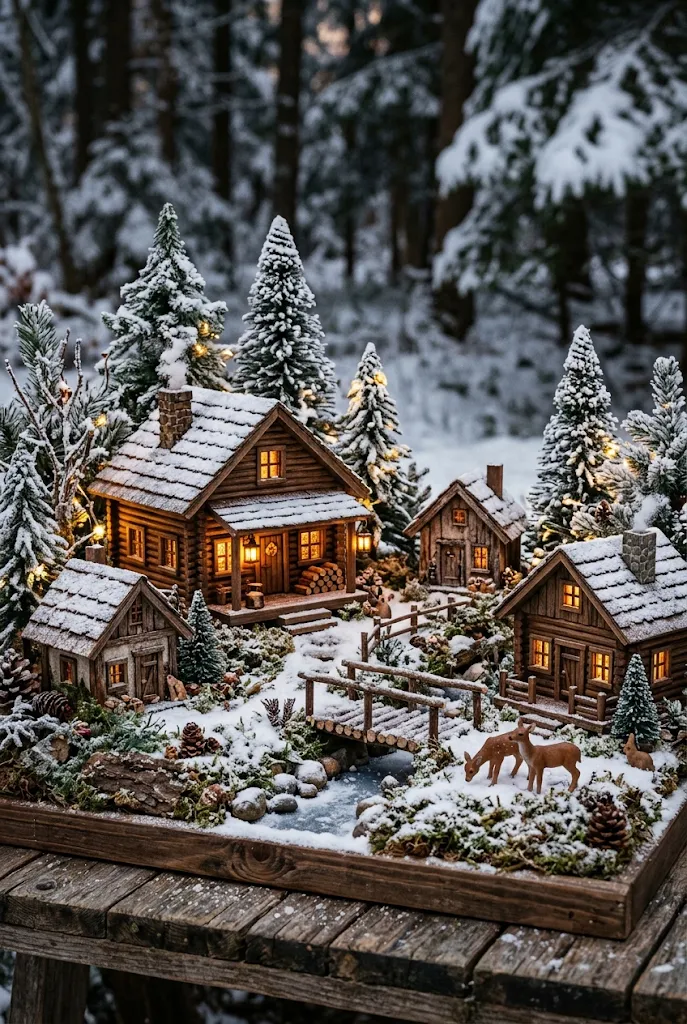
Bring the beauty of a winter forest indoors with a rustic woodland Christmas village. This design feels a little different from traditional ceramic village displays because it focuses on natural textures, earthy colors, and charming forest-inspired details.
Use miniature log cabins, wooden cottages, and small rustic buildings as the foundation. Surround them with artificial moss, pine branches, tiny pinecones, and miniature woodland animals.
A combination of dark green, warm brown, cream, and natural wood creates a beautiful woodland palette.
To make the scene feel more realistic, include:
- Small deer and rabbit figurines.
- Miniature wooden bridges.
- Snow-covered pine trees.
- Natural-looking moss and bark.
- Tiny lanterns with warm lighting.
You can arrange everything on a wooden board or a large shallow decorative tray.
The contrast between earthy woodland materials and soft white snow gives this village a particularly cozy appearance. It works beautifully with farmhouse, cabin-inspired, and traditional Christmas interiors.
Tip: Use different tree heights to create the impression of a tiny forest surrounding the village.
Christmas Village With a Miniature Train
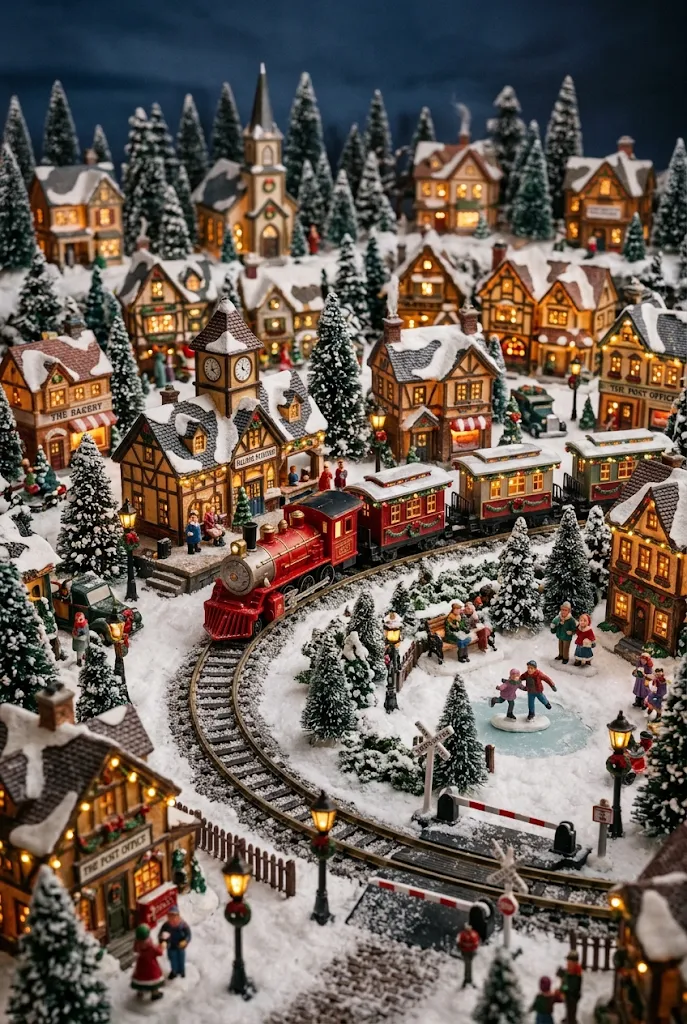
A miniature train can turn an ordinary Christmas village into a lively holiday scene. With its tiny tracks, charming railway station, and little moving train, this display creates the feeling of a traditional Christmas town preparing for the holidays.
Begin with a collection of miniature village buildings, leaving enough open space for the train tracks. Arrange a small railway station toward the back and create a circular or oval track around the buildings.
A traditional red locomotive looks especially beautiful against white snow and evergreen trees. If you prefer a more vintage appearance, choose a classic black locomotive with red details.
Decorate the railway scene with:
- Miniature passengers and railway signs.
- Small snow-covered pine trees.
- Tiny street lamps.
- A miniature station platform.
- Small Christmas gift parcels.
Make sure the train track is easy to access so you can operate and maintain the train without disturbing the rest of the display.
Styling tip: A slightly raised platform can help create a more interesting landscape with the train passing around the village.
Gingerbread-Inspired Christmas Village
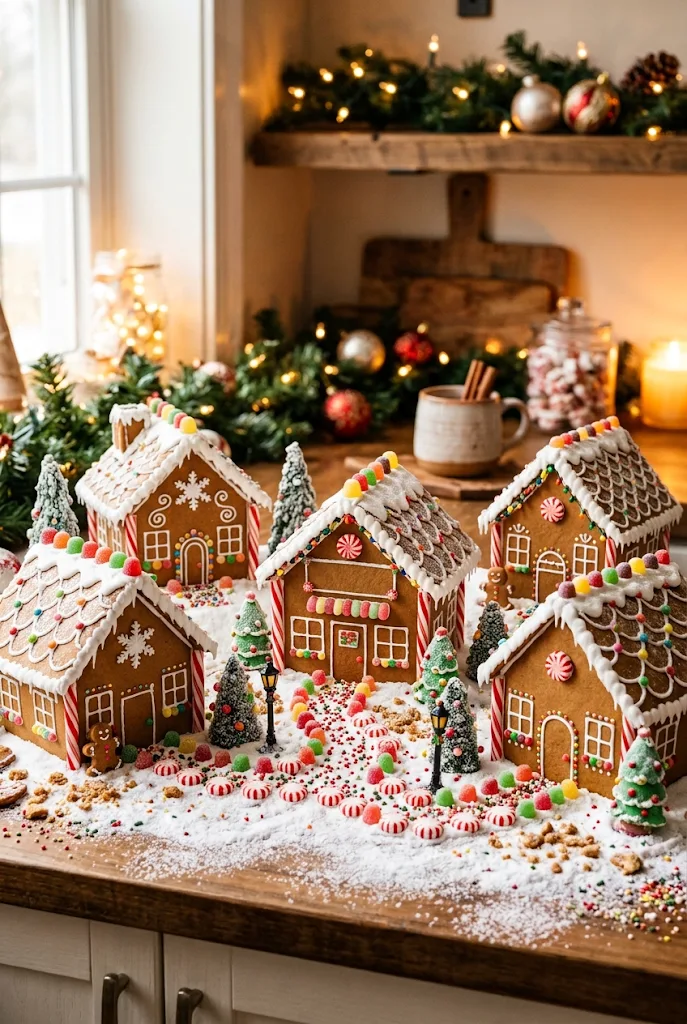
If you enjoy playful and sweet holiday decorating, a gingerbread-inspired Christmas village is a delightful choice. Inspired by traditional gingerbread houses, this theme uses warm brown buildings, white icing-style details, candy decorations, and cheerful festive colors.
You can create this look with actual gingerbread houses or durable decorative replicas. For a reusable display, ceramic or wooden houses painted in gingerbread-inspired colors are especially practical.
Look for houses featuring:
- White icing-style roof decorations.
- Red and white candy-inspired details.
- Colorful miniature gumdrop accents.
- Peppermint-style decorative elements.
- Tiny candy-cane trees and festive figurines.
Place the buildings on a white snow-like foundation to make the brown and colorful details stand out.
A gingerbread village looks particularly charming on a kitchen counter or dining room sideboard. It also makes a wonderful Christmas decorating project to enjoy with children.
Tip: If you use real gingerbread, make sure the display is protected from moisture and is kept away from pets and food-preparation areas.
Christmas Village Inside a Lantern
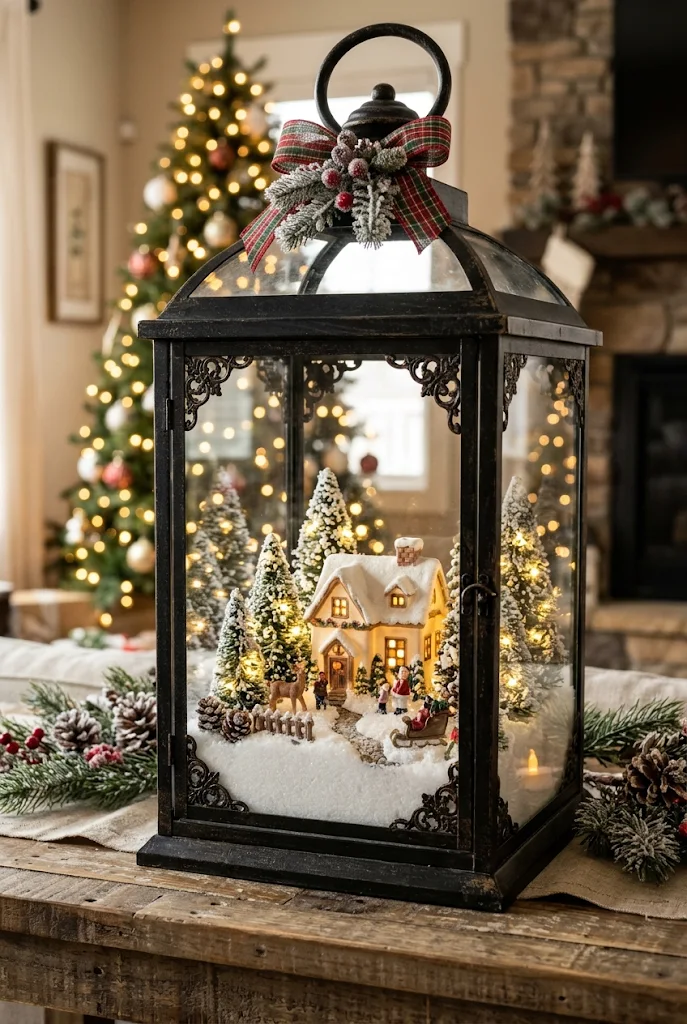
Decorative lanterns offer a beautiful way to display miniature Christmas scenes while giving them a slightly more intimate and enclosed appearance. A large glass-sided lantern can become a tiny winter wonderland filled with glowing houses, snowy trees, and charming seasonal details.
Choose a lantern with enough interior space for a small village arrangement. Black metal lanterns create a traditional farmhouse appearance, while brass and antique-gold finishes feel more elegant.
Place a miniature cottage inside and surround it with a little artificial snow. Add two or three small trees and a few decorative accents to complete the scene.
For a beautiful nighttime effect, use battery-operated fairy lights or a small LED candle.
A lantern village is especially useful when decorating:
- Entryway tables.
- Fireplace hearths.
- Coffee tables.
- Covered porches.
- Bookshelf corners.
Try this: Create a pair of lantern displays using different-sized houses for a coordinated holiday arrangement.
Christmas Village on a Bookshelf
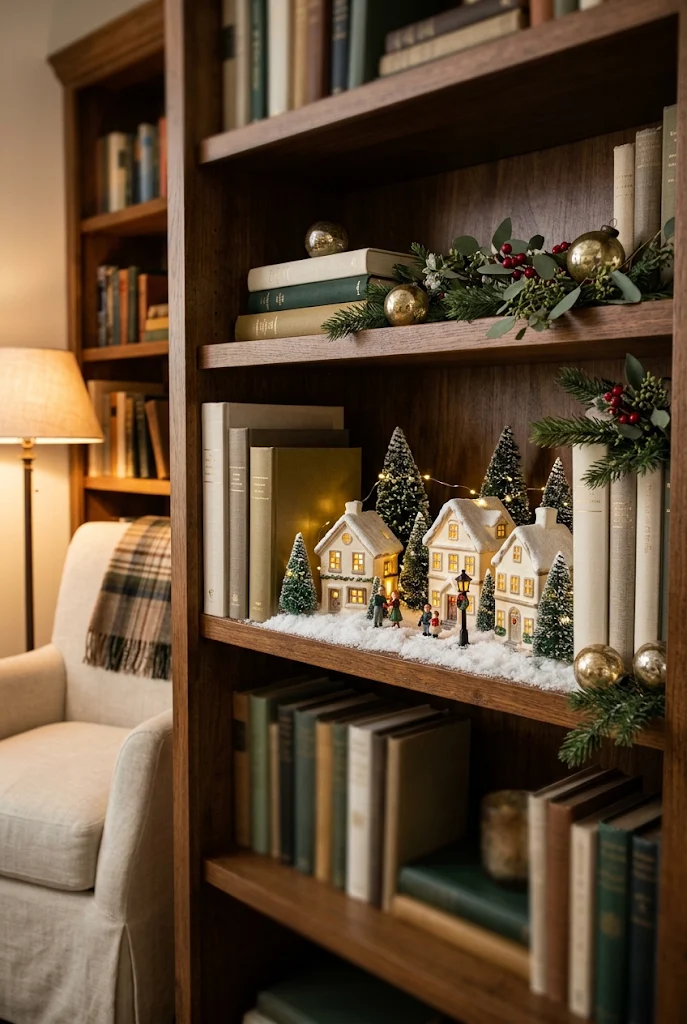
A bookshelf is an unexpected but wonderful place to create a Christmas village. Instead of limiting your seasonal decorations to the mantel or coffee table, you can transform one or two shelves into charming miniature winter streets.
Start by selecting a shelf with enough depth for small village houses. Remove a few books if necessary and create an open area for the buildings. A row of miniature cottages can sit alongside neatly stacked books, evergreen branches, and small decorative Christmas objects.
For a more cohesive appearance, choose neutral or traditional-colored buildings that complement the existing books and furniture.
Some lovely details to include are:
- Miniature snowy houses.
- Small bottle-brush trees.
- Warm battery-operated lights.
- A few vintage-style ornaments.
- Natural greenery tucked between books.
You don’t need to decorate every shelf. Leaving some shelves relatively simple gives the entire bookcase a more polished appearance.
Styling tip: Place the largest village building toward the back of the shelf and smaller trees near the front to create a natural layered effect.
Christmas Village With a Snowy Mountain Background
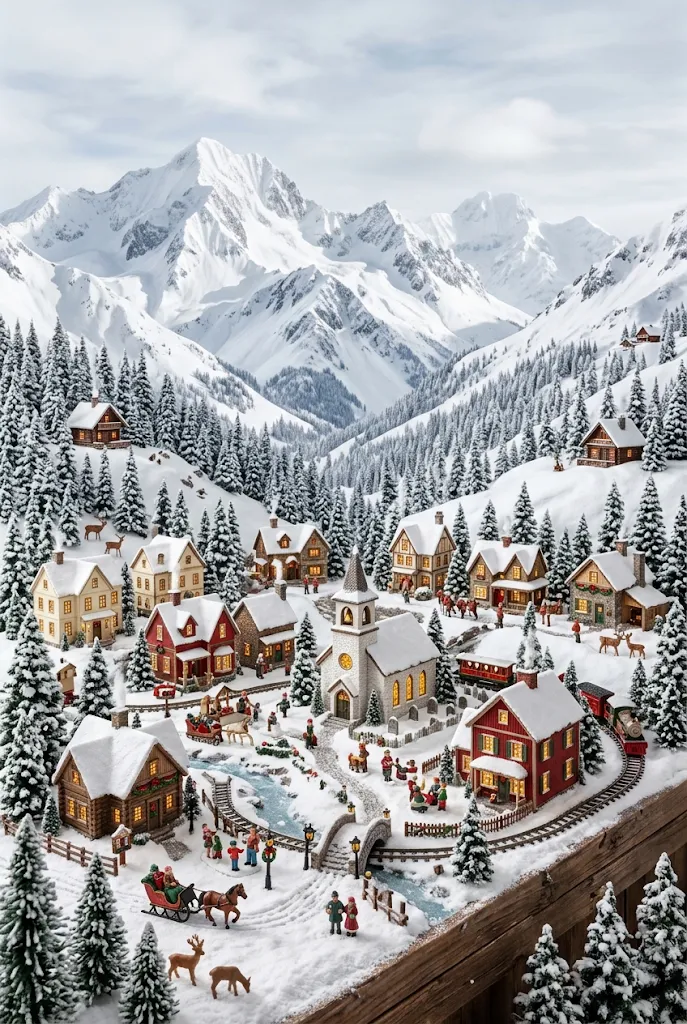
For a display that feels like a complete winter landscape, create a Christmas village with a snowy mountain background. This idea adds another layer to your arrangement and makes the miniature buildings look as though they belong to a real mountain town.
Use lightweight decorative foam or cardboard to create a mountain backdrop. Cover it with white fabric, artificial snow, or snow-textured materials. Position your village houses in front of the mountain scenery, leaving enough room for miniature pine forests and pathways.
You can make the landscape more interesting with:
- Small snow-covered mountain peaks.
- Miniature evergreen forests.
- A tiny winding road.
- Small wooden cabins.
- Miniature deer and woodland figures.
Use different heights to give the scene a natural landscape effect.
This design works particularly well on a large console table or dedicated holiday display surface.
Tip: Keep the background slightly softer in color than the village buildings so the miniature houses remain the main attraction.
Traditional Red and Green Christmas Village
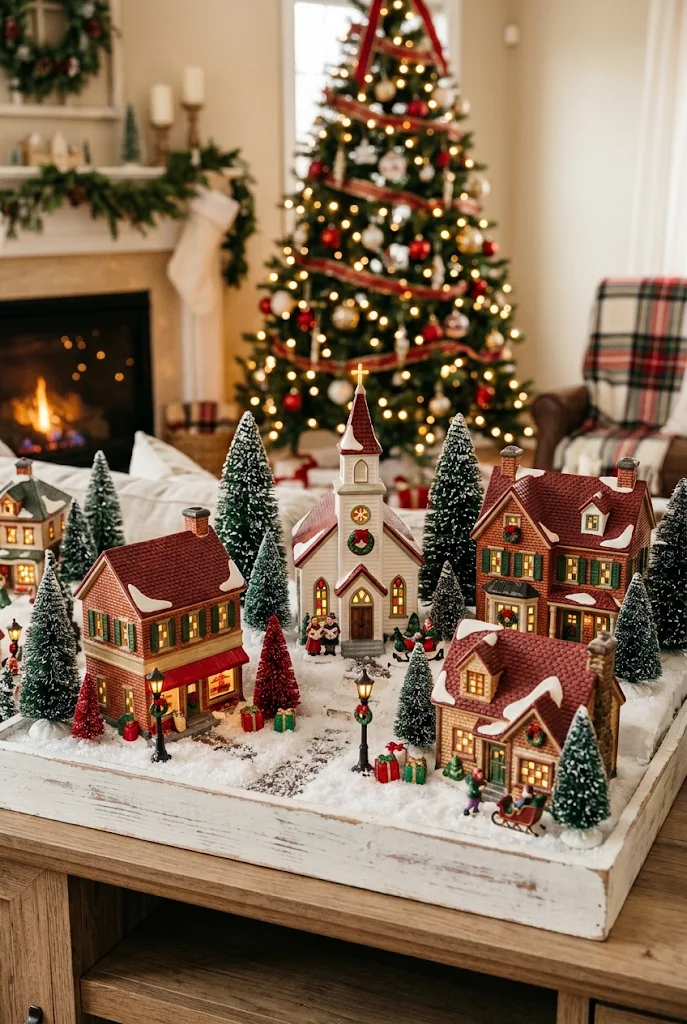
Nothing captures the traditional American Christmas spirit quite like the combination of red, green, and snowy white. A village decorated in these classic colors feels festive, cheerful, and beautifully connected to traditional holiday decorating.
Choose miniature buildings with red roofs, cream walls, green shutters, or traditional red brick details. Arrange them alongside rich green evergreen trees and small red decorative accents.
You can make the entire scene feel more festive with:
- Deep red miniature Christmas trees.
- Green bottle-brush trees.
- Small red gift boxes.
- White snowy pathways.
- Traditional red and gold ornaments.
A natural wood or white display base will help balance the brighter colors.
This style works particularly well in traditional living rooms with red stockings, evergreen garlands, plaid fabrics, and classic Christmas accessories.
Try this: Add a small red village shop in the center to create a cheerful focal point surrounded by neutral cottages.
Miniature Christmas Village With a Frozen Lake
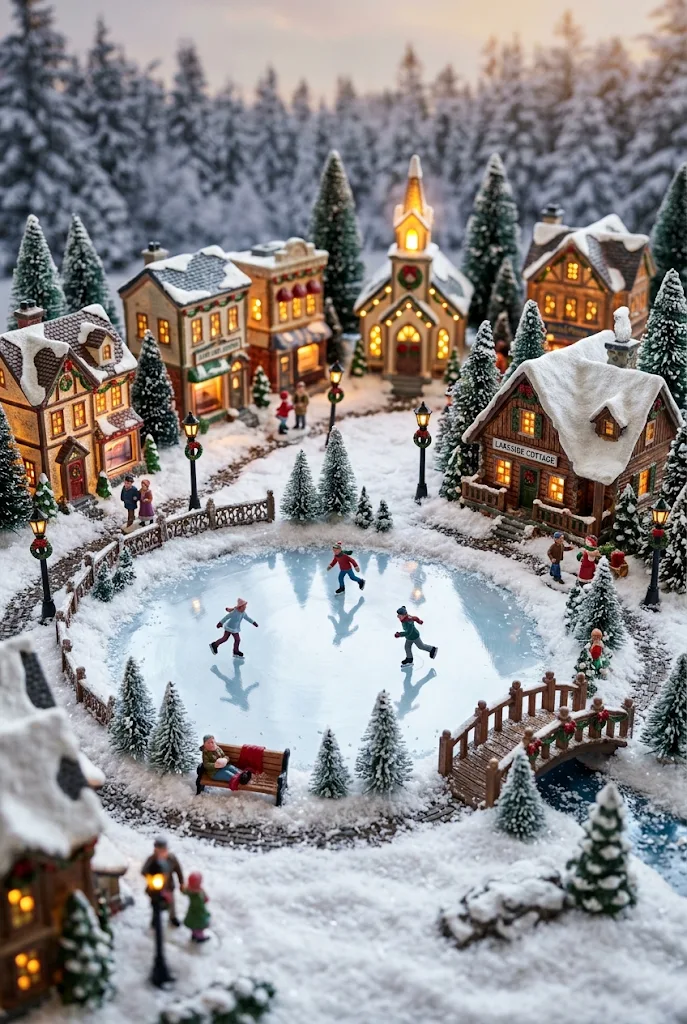
A frozen lake can add an especially magical detail to a miniature Christmas village. It creates a sense of movement and storytelling, making the scene feel like a tiny winter town where people gather for seasonal activities.
Start with a flat oval piece of clear acrylic or a decorative mirror to represent the frozen lake. Surround it with artificial snow and position a few miniature houses nearby.
The most charming details are the little activities taking place around the water. Add tiny ice skaters, a small wooden bench, and miniature street lamps around the edge.
You can also include:
- Snow-covered pine trees.
- A small lakeside cottage.
- Miniature wooden fences.
- Tiny winter figures.
- A little bridge crossing one side of the lake.
For a more realistic appearance, keep the lake surface smooth and slightly reflective.
This idea works beautifully as the central feature of a larger Christmas village, especially when paired with a snowy mountain or woodland background.
Tip: A small battery-powered spotlight positioned nearby can create beautiful reflections on the lake surface.
Minimalist Neutral Christmas Village
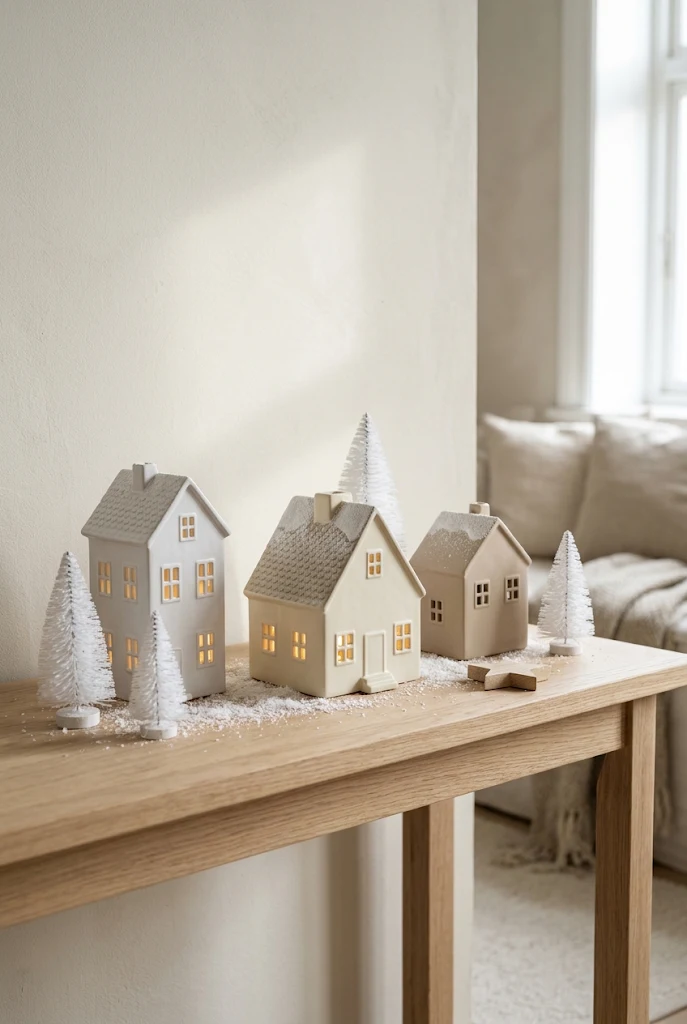
If you prefer a calm and uncluttered home, a minimalist Christmas village is a beautiful alternative to traditional colorful displays. This style uses simple architectural shapes, understated decorations, and a soft neutral palette to create an elegant winter scene.
Choose miniature houses in ivory, beige, soft white, or pale gray. Simple ceramic buildings with clean lines work especially well because they allow the natural shapes and textures to stand out.
Instead of filling the entire display with decorations, focus on a few carefully selected pieces.
For example:
- Two or three neutral ceramic cottages.
- A handful of simple white trees.
- Soft artificial snow.
- One small wooden accent.
- Delicate warm-white lighting.
Place the village on a light oak shelf, white console, or natural stone tabletop.
The beauty of minimalist decorating comes from giving each item enough breathing room. A little empty space can make even a small village feel thoughtfully styled.
Styling tip: Avoid mixing too many metallic finishes. Natural wood and warm white lighting are enough to create a beautiful, cozy atmosphere.
Christmas Village Inside a Wooden Shadow Box
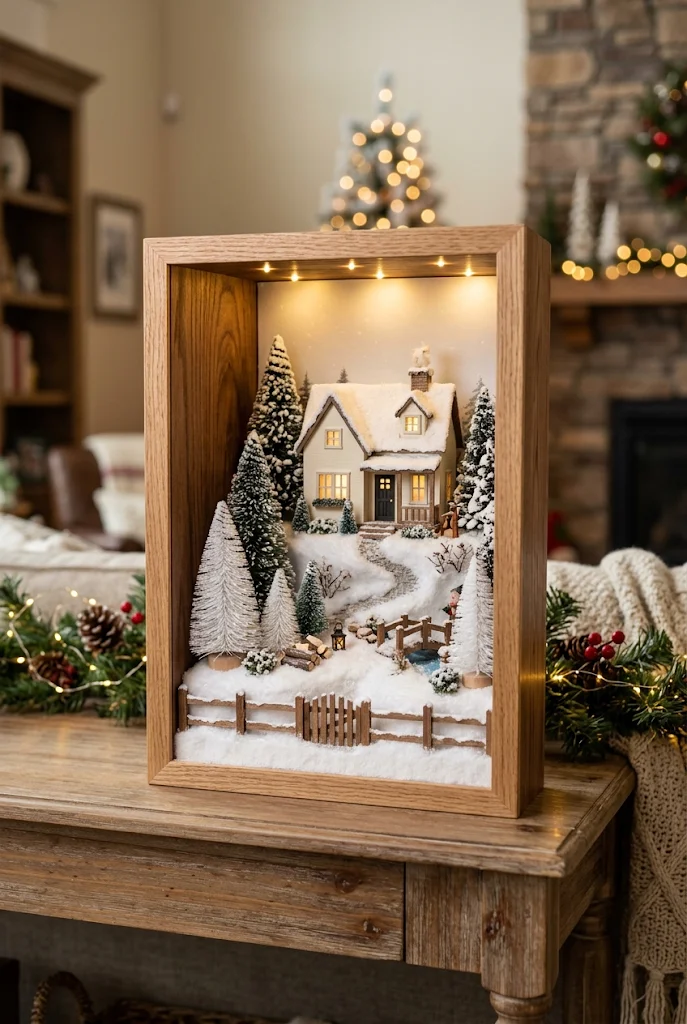
A wooden shadow box offers a creative way to build a small Christmas village that looks like a miniature framed winter scene. Because the box provides a defined structure, you can create a detailed display without needing a large amount of decorating space.
Choose a deep wooden shadow box with enough room for miniature houses and trees. A natural wood finish creates a rustic appearance, while painted white or cream frames feel more elegant.
Arrange a small cottage at the back and add miniature trees in front. A layer of artificial snow can create a soft landscape across the bottom.
Consider incorporating:
- Tiny warm LED lights.
- Small wooden village buildings.
- Miniature snowy trees.
- A little decorative fence.
- Small winter figurines.
You can place the shadow box on a shelf or lean it against a wall on a console table.
For a more polished appearance, use a coordinated color scheme and avoid filling every available space with decorations.
Tip: Add a small battery-powered light strip inside the top of the box to illuminate the entire village evenly.
Christmas Village With Miniature Street Lamps
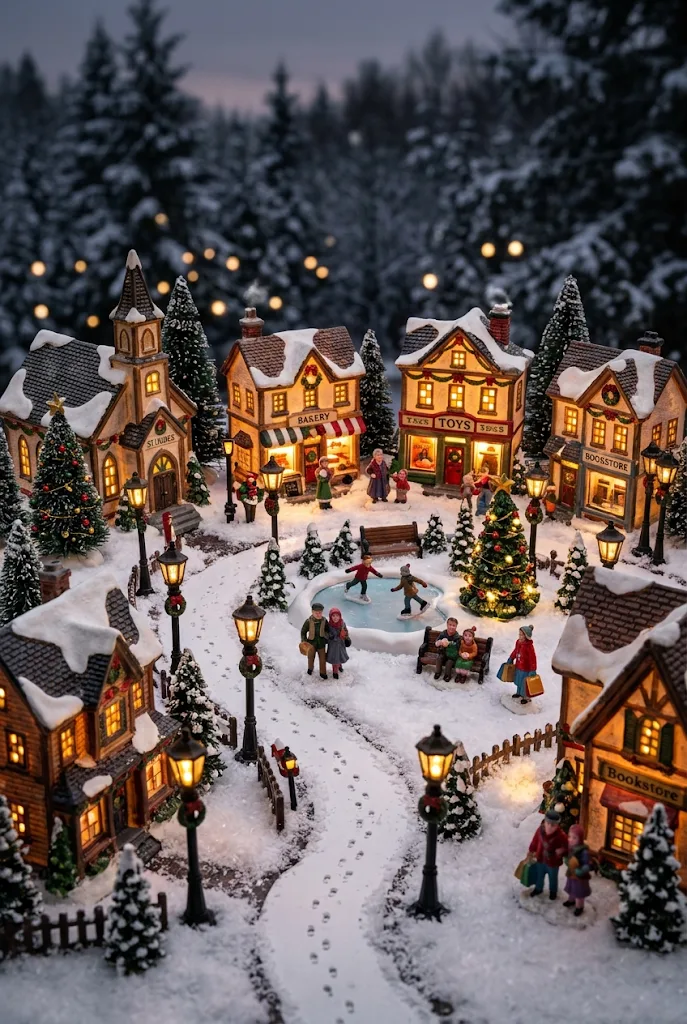
Tiny street lamps can make a Christmas village look much more realistic, especially when the entire display is illuminated in the evening. They add architectural character and create the feeling of a little town preparing for Christmas night.
Choose miniature black, bronze, or antique-gold street lamps. Arrange them along the snowy pathways between the houses rather than placing them randomly throughout the display.
A combination of street lamps and glowing windows creates a lovely balance of lighting.
For a detailed village scene, consider adding:
- A miniature town square.
- Small snow-covered benches.
- A tiny village church.
- Miniature pedestrian figurines.
- Narrow snowy walkways.
You can also create a focal point by placing two matching street lamps at the entrance to your village.
The key is to keep the lighting warm and consistent. Bright, cool lighting can make the scene feel less inviting, while warm golden light gives it a traditional winter-evening atmosphere.
Try this: Position one small lamp near the front of the display so its glow highlights the snow-covered pathway.
Christmas Village With a Church as the Centerpiece
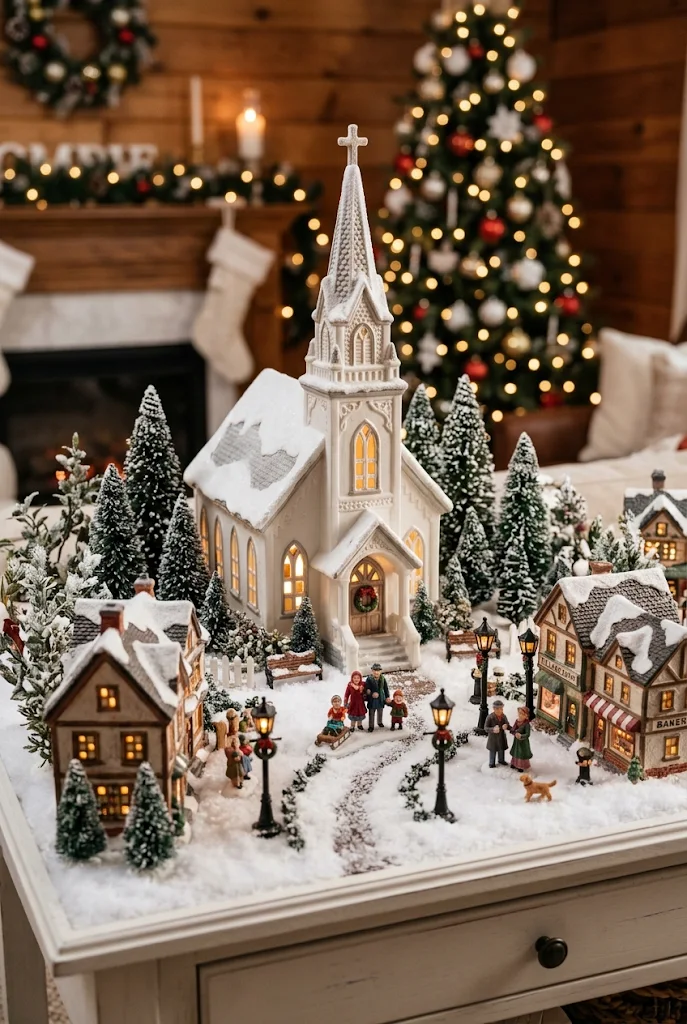
A miniature church can become the most beautiful centerpiece in a traditional Christmas village. Its tall steeple, detailed windows, and charming architectural features naturally draw the eye and give the entire display a sense of place.
Choose a church with a snowy roof, detailed entrance, and warm illuminated windows. Position it slightly behind the center of the arrangement so it stands taller than the surrounding houses.
Surround the church with small cottages and miniature evergreen trees. You can create a little village square in front, using decorative snow and a few tiny figures to make the scene feel welcoming.
Additional details that work beautifully include:
- Small bronze street lamps.
- A tiny church pathway.
- Miniature snow-covered benches.
- Delicate evergreen wreaths.
- Small decorative fences.
This arrangement looks especially beautiful on a fireplace mantel or a dedicated holiday console table.
Styling tip: Use buildings with simpler details around the church so the centerpiece remains the main attraction.
DIY Christmas Village With Cardboard Houses
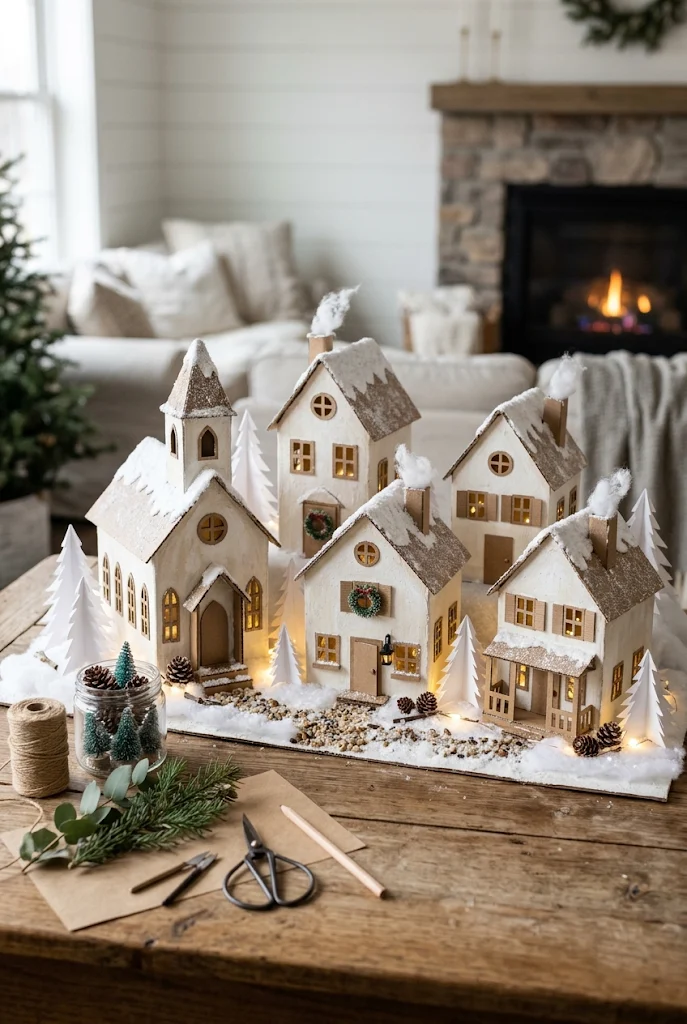
You don’t have to purchase expensive collectible buildings to enjoy a beautiful Christmas village. Handmade cardboard houses are an affordable and creative alternative that can be customized to match your holiday decorating style.
Start with sturdy cardboard or small recycled boxes. Cut out simple house shapes, add windows and doors, and cover the exterior with white, cream, or kraft-colored paper.
For a snowy appearance, use white paint or decorative modeling paste to create textured rooftops. You can also add small paper trees and cardboard chimneys.
Useful supplies include:
- Recycled cardboard or small boxes.
- White craft paint.
- Scissors and craft glue.
- Decorative paper.
- Small LED tea lights.
- Artificial snow and miniature greenery.
Arrange your finished houses on a wooden board or white tray. Vary the heights and shapes so the little town looks more natural.
If you’re making this project with children, let them decorate individual houses with their own colors and patterns.
Important: Only use battery-powered lights with cardboard decorations. Keep paper and cardboard away from real flames and hot bulbs.
Christmas Village on a Window Sill
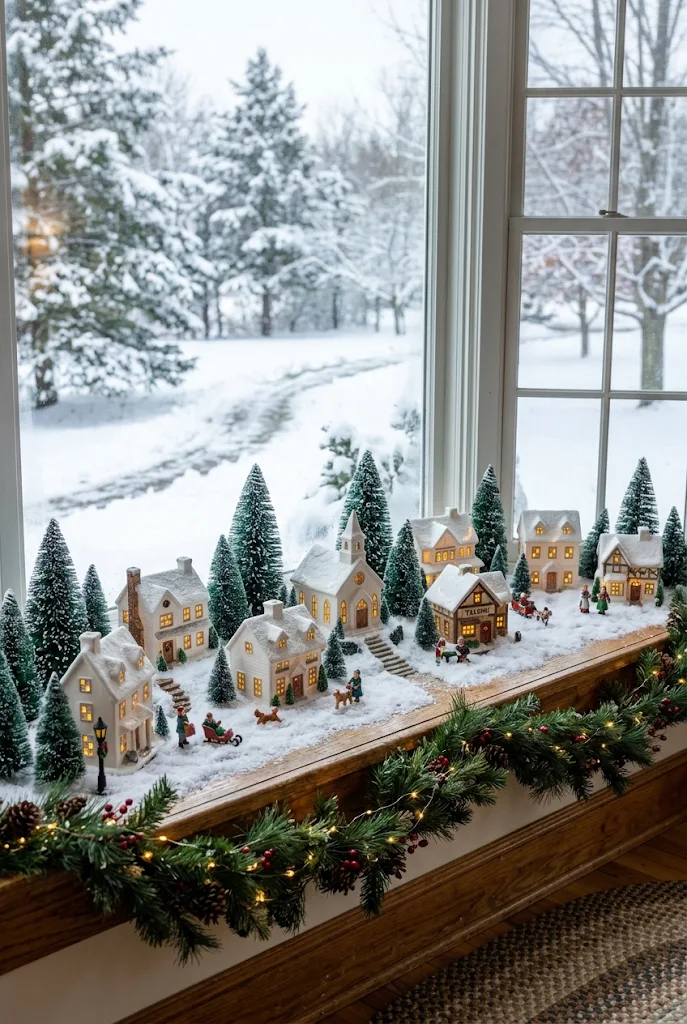
A window sill can be a lovely place for a miniature Christmas village, especially when the display is visible from both inside and outside the home. During the day, natural light highlights the small architectural details, while evening lighting creates a beautiful glow against the darker winter window.
Choose a few smaller ceramic houses that fit comfortably along the sill. Position the tallest building toward one side and arrange shorter cottages and trees around it.
To make the scene feel like a complete winter landscape, add a layer of white artificial snow along the surface. Small evergreen trees help fill the spaces between the buildings without making the arrangement look too crowded.
You can also include:
- Tiny snow-covered cottages.
- Miniature bottle-brush trees.
- Warm battery-operated lights.
- Small decorative stars.
- A delicate evergreen garland along the edge.
If your window receives direct sunlight, avoid using delicate materials that may fade or become damaged.
Tip: Use a simple white or natural wood base to protect the sill and make the decorations easier to arrange.
Christmas Village With a Candy Cane Theme
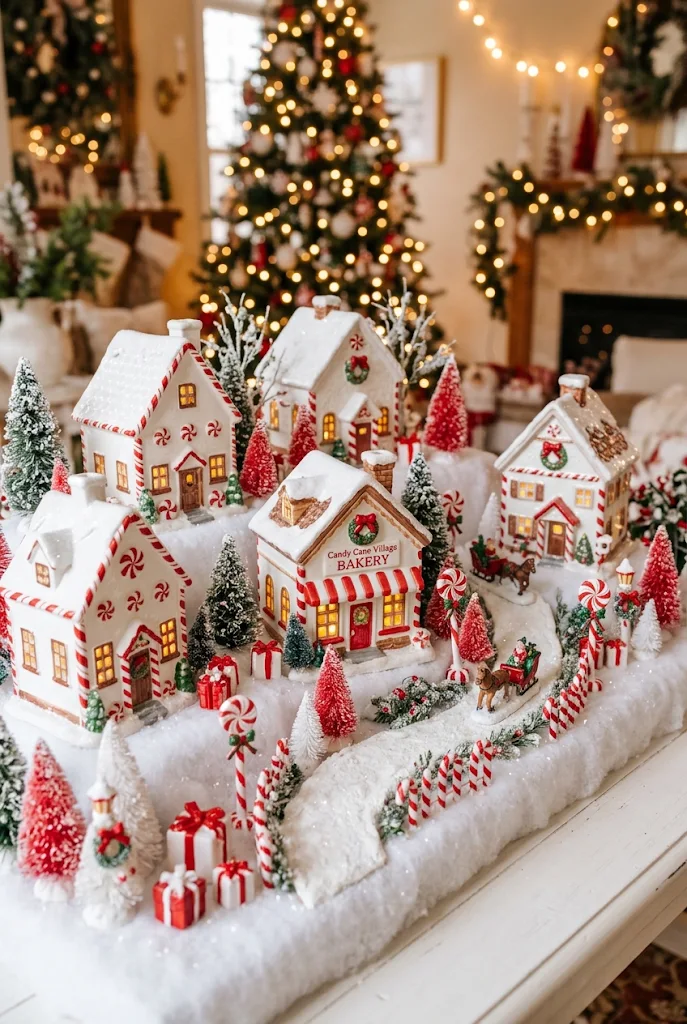
For a cheerful and playful holiday display, try decorating your Christmas village with a candy cane theme. Inspired by classic peppermint sweets, this look combines red and white details, charming miniature houses, and candy-inspired decorative accents.
Start with white ceramic cottages and add red-and-white bottle-brush trees around them. Look for miniature decorations shaped like candy canes, peppermint swirls, and striped Christmas ornaments.
A white snowy foundation helps the red details stand out beautifully.
You can complete the scene with:
- Red-and-white striped miniature trees.
- Tiny peppermint ornaments.
- Small candy cane fences.
- Red miniature gift boxes.
- White snowy pathways.
For a more sophisticated version, limit the palette to white, soft red, and a little natural greenery rather than using too many bright colors.
This style looks wonderful in kitchens, family rooms, and other spaces where you want a cheerful Christmas atmosphere.
Try this: Add a small candy-inspired village bakery as the main focal point to make the arrangement feel like a tiny holiday sweet shop.
Enchanted Christmas Village With Twinkling Fairy Lights
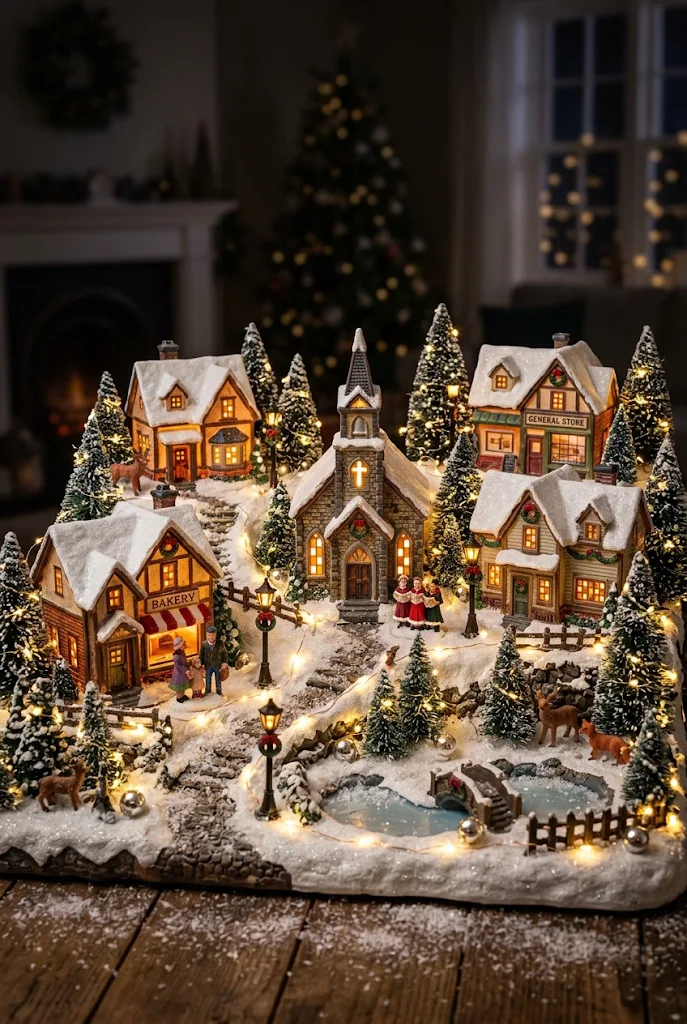
If you want your holiday decorations to feel truly magical, create an enchanted Christmas village filled with delicate twinkling fairy lights. Rather than relying only on the lights inside the miniature buildings, this arrangement uses multiple layers of warm illumination to create a beautiful glowing winter landscape.
Begin with a collection of snowy cottages, miniature trees, and a few woodland details. Arrange the buildings at different heights and weave tiny fairy lights around the trees and along the snowy pathways.
The goal is to create a soft glow throughout the scene without making the individual lights too distracting.
For a magical finishing touch, add:
- Warm-white micro fairy lights.
- Snow-covered miniature pine trees.
- Small illuminated street lamps.
- Tiny woodland animals.
- Delicate reflective ornaments.
A dark wooden base or a neutral display platform helps the golden lighting stand out.
This arrangement is particularly beautiful in the evening, when the rest of the room is softly lit and the village becomes the main decorative feature.
Tip: Use battery-powered LED fairy lights with a timer so your display can glow automatically each evening without needing to switch everything on manually.
Simple Tips for Creating a Beautiful Christmas Village at Home
Once you’ve chosen your favorite Christmas village decorations, a few thoughtful styling decisions can make the finished display look much more professional.
Choose a consistent color palette
You don’t need every building to match, but choosing a general color scheme helps everything look coordinated. White and gold, traditional red and green, rustic brown and cream, and soft neutral shades are all beautiful options.
Create different heights
Avoid placing every house and tree in one straight line. Use small decorative risers, wooden blocks, or layered platforms to create a more realistic landscape.
Add realistic snow
Artificial snow, white fabric, and snow-textured materials can help transform a simple tabletop into a winter scene. Use different textures to create more natural-looking snowy surfaces.
Pay attention to lighting
Warm-white LED lights are especially beautiful for Christmas villages. Combine illuminated houses, miniature street lamps, and delicate fairy lights for a balanced appearance.
Leave enough space between decorations
A village looks more interesting when individual buildings and decorative details can be appreciated. Avoid filling every empty space with trees, ornaments, or figurines.
Think about where the village will be displayed
A fireplace mantel, console table, bookshelf, kitchen island, or window sill can all work beautifully. Consider the available space before purchasing miniature buildings.
Store your decorations carefully
After the holidays, wrap ceramic houses individually in protective tissue or bubble wrap. Store miniature trees, lights, and figurines in separate containers to keep everything organized for next Christmas.
Final Thoughts
Christmas village decorations are more than just seasonal accessories. They bring a little storytelling, nostalgia, and winter magic into your home. Whether you prefer a traditional snowy town, a rustic woodland scene, a sophisticated white-and-gold arrangement, or a playful gingerbread-inspired display, there’s a beautiful way to make this holiday tradition your own.
You can begin with just a few miniature houses and gradually add trees, lights, figurines, and other details over the years. The most beautiful displays aren’t necessarily the biggest or most expensive ones. They’re the ones thoughtfully arranged with colors, textures, and little details that make your home feel warm and welcoming.
Choose an idea that matches your decorating style, gather your favorite miniature pieces, and create a Christmas village that your family will look forward to seeing every holiday season